This was a little project inspired by Nick Offerman’s Christmas video, intended to warm up a cold office corner at work.


I started with Ana White’s beloved tutorial and adjusted to get the look I wanted. Following Ana’s cutting guide I had the guy at the hardware store cut all the piece for me when I bought them.
Shopping/equipment List:
1 – 1×12 @ 8 feet long
1 – 1×10 @ 6 feet long
1 – 1×8 @ 6 feet long
1 – 1×6 @ 10 feet long
1 – 1×4 @ 4 feet long
3 – 1×3 @ 8 feet long
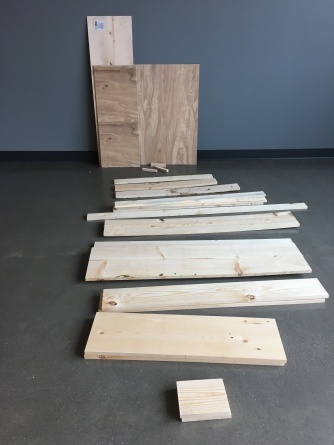
Cut List:
1 – 1×12 @ 48″
2 – 1×10 @ 32 3/4″
2 – 1×6 @ 44″
4 – 1×3 @ 44″
1 – 1×4 @ 33 1/4″
1 – 1×3 @ 33 1/4″
1 – 1×8 @ 51″
4 – 1×6 @ 3/4″
2 – 1×6 @ 7″
I added a 34″ square cut from a 48″ piece of plywood which left me with a perfect 14″x 48″ remanent I used for the bottom to make more of a hearth.
Assembly
Following the Ana White instructions we just started nailing the pieces together. It went very fast from there. Nailing the back and bottom on it was important to measure where the 1×2 were behind it to make sure we centered the nails on them to avoid splitting or having the nails show through.

we also took the risk on the bottom smaller pieces and nailed rather than gluing them and did not have any issues with splitting.
If your boards are bowed, you may want to grab some screws to press the board in flat, as the nails will not be strong enough for that.
Painting
This was the fun part!
I started with two coats of of a very dark brown stain. It took less than 5oz of stain for both coats. I used a cheap bristled stain brush.

I wish I had more photos for the marble part but I will walk you through my steps. I watched several tutorials and then went with the following process:
First I prepared the area. Once the stain was dry I used painters tape to tape news paper around the edges and made sure my plywood was clean of dust and such.
For each of the paint mixing steps I started with white and added black little by little until I got the shades of gray I was looking for.
I started painting by adding just a couple drops of black to a good bit of white and using a foam roller to do a base coat all over the back and base. I did the few drops of black because I wanted the base color to be just a tad on the grey side. If you like the bright white you can skip that step.
Next I mixed my darkest grey – about 2/3 white and 1/3 black – and used the feather to draw the veins. I used the feather because it give the lines a lighter natural look than a paint brush. It is important your veins all move in the same general direction as this is how real marble would form. if you look I my photo you can see I went from top Left to bottom right generally.
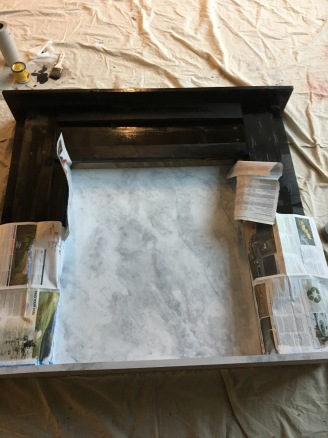
next I mixed a slightly lighter gray – maybe 1/4 or less black and 3/4 white. I got the sponge wet to help thin the paint and lightly sponged around the outsides of the veins. If it got too thick, I would use the wet rag and lightly dab or work in circular motions to lighten and add wispiness to the sponge paint.
The sponge part was the hardest part and I worked in layers, sponging on the original white base coat layer and then more of the lighter gray until I got the look I wanted.
Logs
For the logs I tried to follow this tutorial.
I used a box cutter and made random cuts in cardboard and then rolled the cardboard several times in both directions to add some wear and tear. I then took them outside and spray painted them with some leftover dark metallic spray paint, letting some of the brown show through to look like a smolder. I then taped two together and filled them with orange halloween lights. Finally, I used a couple remnants of wood from the cut pieces to prop them up in the hearth.
If I had thought of this earlier, I would have cut a notch for the light cord in the center back of my plywood before connecting it to the rest of the fireplace.
Finishing Touches
Once dry, I carried the fireplace upstairs and adorned it with some scotch glasses and a gold side table from goodwill and found a nice leather chair and some books from around other parts of the office to make it cozy.
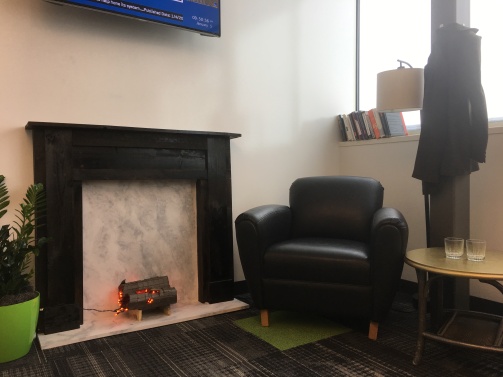
I really like the way it turned out. Skipping the moulding gave it that masculine Nick Offerman look and the lights, however costume-y actually make it feel warmer! I am on the lookout for something that will crackly and flicker a bit more but for now I think this is pretty good!
Happy Crafting!


